From White to Blue, and Olive, too: The Colorful World of Chicken Eggs

If you are considering raising chickens for eggs, one of the things you might be interested in is the variety of egg colors that different breeds produce. Not only can this be a fun and interesting way to add some visual appeal to your egg collection, but it can also provide valuable information about the nutritional content of your eggs.

The most common egg color is white, which is produced by many breeds of chicken. However, if you are looking for something more unique, here are some of the breeds that produce colorful eggs:

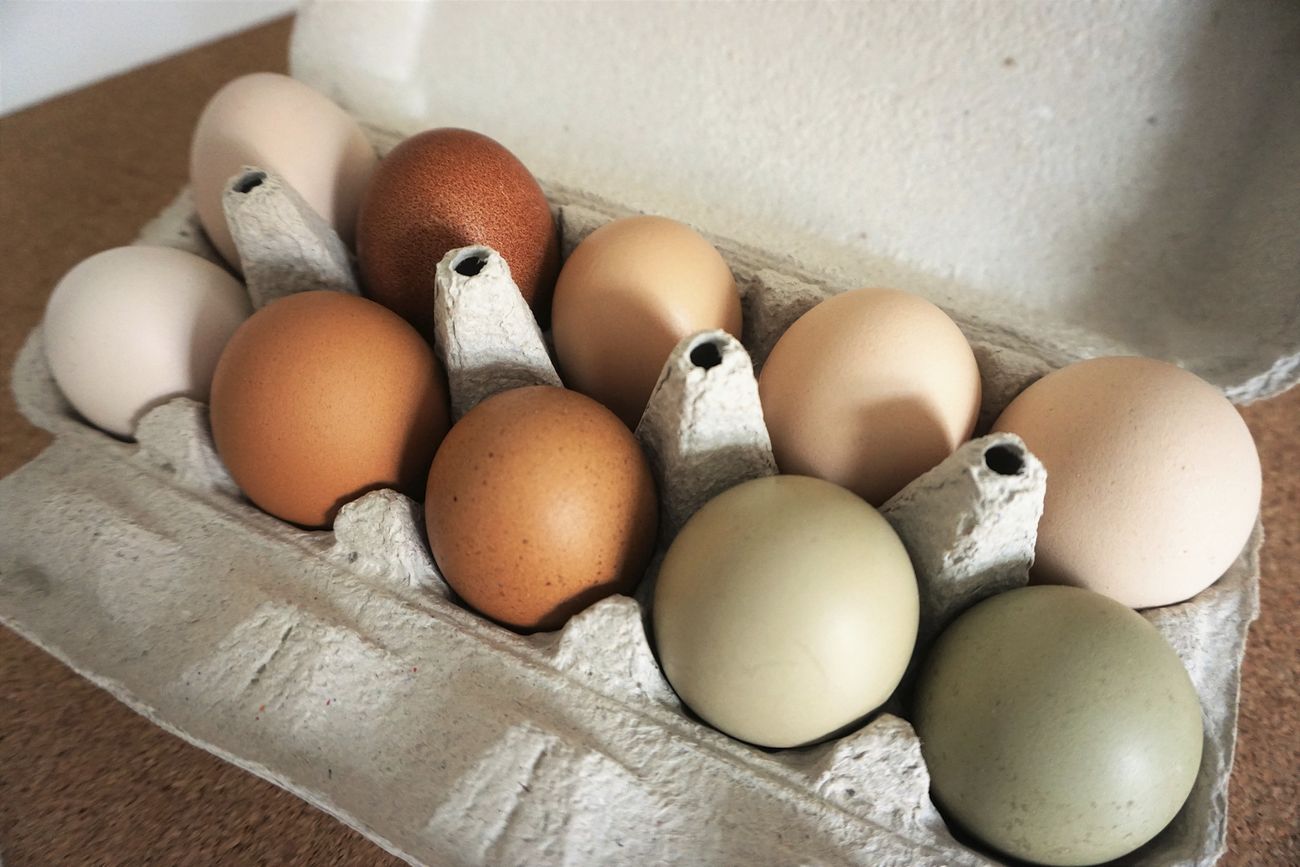
  1. Ameraucana: This breed is known for its blue eggs, which are a popular choice among egg enthusiasts. These chickens also have a friendly disposition and can be great pets.
  2. Easter Eggers: Similar to Ameraucanas, Easter Eggers also produce blue eggs, but can also produce green, pink, or brown eggs. They are a mixed breed and can come in a variety of colors and patterns.
  3. Marans: These chickens produce eggs with a deep chocolate brown color. The color of the eggs can range from a lighter brown to a nearly black shade. They are known for their hardiness and are a good choice for cold climates.
  4. Welsummer: This breed produces eggs with a rich, terracotta color. The eggs can have speckles or spots, which add to their visual appeal. They are also known for being good foragers, making them a good choice for free-range setups.
  5. Olive Eggers: These chickens are a cross between a breed that produces blue eggs and a breed that produces dark brown eggs, resulting in eggs with a greenish hue. They are a newer breed and gaining popularity among backyard chicken keepers.

It is important to note that egg color does not necessarily indicate nutritional content. However, eggs with darker yolks tend to have more nutrients, such as vitamin D and omega-3 fatty acids. In general, chickens that are allowed to free-range and have access to a varied diet will produce more nutritious eggs.

When choosing breeds for egg production, it is important to consider factors such as egg size, frequency of laying, temperament, and cold hardiness. Some breeds, such as Leghorns, are known for their high egg production but can be flighty and nervous. Others, such as Rhode Island Reds, are known for their hardiness and calm temperament but may not produce as many eggs.

Choosing breeds of chickens that produce colorful eggs can add some fun and variety to your egg collection. However, it is important to also consider factors such as egg size, frequency of laying, and temperament when selecting breeds for egg production. Ultimately, with the right care and environment, any breed of chicken can produce delicious and nutritious eggs.

The Best Trees for Maple Syrup Production And How To Identify Them

Maple syrup is a popular natural sweetener that is harvested during the late winter and early spring months. However, not all trees produce sap with enough sugar content to make syrup. In this article, we will explore the different types of trees that can be used in the syrup making process and how to identify them.

Sugar Maple

Sugar maple is the most commonly tapped tree for syrup production. This tree typically has a grayish-brown bark, which becomes scaly with age. The leaves of the sugar maple have five lobes and are deeply notched. The sap of this tree has a high sugar content, which makes it ideal for syrup production.

Black Maple

Black maple is another species of maple that is used to make syrup. This tree has a darker bark than the sugar maple and is often found in lowland areas. The leaves of the black maple have three lobes and are not as deeply notched as those of the sugar maple. The sap of this tree also has a high sugar content.

Red Maple

While not as commonly tapped for syrup production, the red maple can be used in the process. This tree has a smooth, grayish-brown bark that becomes ridged with age. The leaves of the red maple are typically three-lobed and have a shallow notch between each lobe. The sap of this tree has a lower sugar content than the sugar and black maple, but it can still be used to make syrup.

Silver Maple

Silver maple has a lower sugar content than sugar maple, so it requires more sap to produce a gallon of syrup. However, it has a distinct flavor that is often used in blends with other maples to create unique syrups.

Bigleaf Maple

Bigleaf maple is native to the Pacific Northwest and produces a sap with a lower sugar content than sugar maple. Its sap has a unique flavor that is often described as buttery or caramel-like.

Box Elder

Box elder is a species of maple that is often overlooked for syrup production. This tree has a grayish-brown bark with a slightly greenish tint. The leaves of the box elder have three to five leaflets and are deeply notched. The sap of this tree has a lower sugar content than the sugar and black maple, but it can still be used to make syrup.

Birch

Birch trees can also be tapped for syrup production. The bark of the birch tree is white with black triangular markings. The leaves of the birch tree are typically oval-shaped with a pointed tip. The sap of the birch tree has a lower sugar content than maple trees, but it can still be used to make syrup.

When selecting trees to tap for syrup production, it is important to choose trees with a high sugar content in their sap. Sugar maple and black maple are the most commonly tapped trees, but red maple, box elder, and birch trees can also be used in the syrup making process. By learning how to identify these trees, you can ensure a successful maple syrup harvest.

The Truth About Raising Chickens: Debunking Common Myths and Misconceptions

Raising chickens at home has become increasingly popular in recent years. With concerns over food security, health, and the environment, more and more people are turning to backyard chicken-keeping as a way to have fresh, healthy eggs and meat. However, there are many myths and misconceptions about raising chickens that can be misleading for those considering this hobby.

Let’s dispel the 10 biggest myths about raising chickens at home.

Myth #1: Raising chickens is only for farmers or people living in rural areas.

This is perhaps the biggest myth about raising chickens. Anyone can keep chickens, regardless of where they live. You do not need a large piece of land or a farm to raise chickens. Chickens can be kept in small backyards, and there are many urban and suburban chicken-keepers around the world.

Myth #2: Chickens are noisy and will disturb your neighbors.

While it is true that roosters can be noisy, hens are relatively quiet. They will only make noise when they lay an egg or when they are startled. With proper care and management, noise should not be an issue for your neighbors.

Myth #3: Chickens are dirty and smell bad.

Like any animal, chickens can be messy. However, with proper care and management, they are not dirty or smelly. Cleaning their coop regularly and providing them with clean water and food can help keep them clean and odor-free.

Myth #4: Chickens are hard to care for and require a lot of time and effort.

While raising chickens does require some effort and time, it is not as difficult as some people may think. Chickens are fairly self-sufficient and only require a few minutes of daily care, such as feeding and watering, and cleaning their coop weekly.

Myth #5: Chickens are expensive to raise.

The cost of raising chickens can vary depending on the setup and location, but in general, chickens are relatively inexpensive to raise. Chickens are efficient at converting food into eggs and meat, making them a cost-effective source of food for many families.

Myth #6: Chickens are prone to disease and require regular veterinary care.

While chickens can get sick, they are generally hardy and do not require regular veterinary care. As long as they are provided with a clean and healthy environment, good nutrition, and access to clean water, they should stay healthy.

Myth #7: Chickens attract pests and predators.

Like any animal, chickens can attract pests and predators. However, with proper management and protection, this should not be an issue. Providing a secure coop and run for your chickens, and regularly removing food scraps and other attractants can help prevent pests and predators.

Myth #8: Chickens lay eggs every day.

Contrary to popular belief, chickens do not lay eggs every day. Hens typically lay eggs every 24-26 hours, but this can vary depending on the breed, age, and other factors.

Myth #9: Chickens can only lay eggs in the spring and summer.

While chickens do tend to lay more eggs in the spring and summer, they can lay eggs year-round with the proper lighting and nutrition. Providing artificial lighting during the winter months can help stimulate egg production.

Myth #10: Chickens are not friendly pets and do not make good companions.

Chickens can be very friendly and make great pets. Many breeds are docile and enjoy being held and cuddled. Chickens can also be trained to come when called and can be very social with their owners.

There you have it! Raising chickens at home is a fun and rewarding hobby that anyone can enjoy. By dispelling these common myths, we hope to encourage more people to consider raising chickens and experience the joys of fresh, healthy eggs right from their own flock.

Growing Together: How Small Farming Projects Can Help You Bond With Your Children

Spring is a time for new beginnings and fresh starts, and what better way to welcome the season than by involving your children in your farm chores and gardening projects?

Here are some tips on how to keep your kids engaged and entertained while working around the farm:

  1. Assign age-appropriate tasks: Give your children tasks that they can handle based on their age and abilities. For younger children, simple tasks like gathering eggs or watering plants are perfect. Older children can handle more complicated tasks like weeding, planting, or even helping with animal care. Make sure to give them clear instructions and show them how to do the task correctly.
  2. Make it a game: Turning work into a game is a great way to keep children motivated and engaged. You can turn weeding into a scavenger hunt or a treasure hunt by hiding small treats or prizes throughout the garden for them to find. See who can collect the most eggs or who can find the biggest potato. This will make the tasks feel like fun, and your children will be eager to help out.
  3. Teach them as you work: Use this time to teach your children about the different plants, animals, and insects they encounter. Point out different types of vegetables and herbs and explain how they grow and how they can be used. Teach them about the importance of soil and how it affects the plants. When caring for animals, explain their behavior and how to properly care for them. Not only will they learn about the farm, but they will also gain valuable life skills.
  4. Take breaks and have fun: Don’t forget to take breaks and have fun with your children while working around the farm. Take a snack break and enjoy a healthy snack together, or take a walk around the property to explore nature. Enjoying the process and spending time with your children will create a positive experience that they will cherish.
  5. Involve them in decision-making: Involve your children in the decision-making process when it comes to gardening and farming. Ask for their input on what vegetables to plant, what animals to raise, and what improvements to make around the farm. This will give them a sense of ownership and responsibility, and they will be more likely to take pride in their work.

Involving your children in farm chores and gardening projects is not only a fun way to spend time together, but it also teaches them important life skills and values. It creates a sense of responsibility and ownership, and it encourages a healthy and active lifestyle. So grab your gardening tools and get ready to make some memories with your children this spring!

Laura Ingalls Wilder’s “Sugar Snow”: A Fascinating Phenomenon of Late Winter

In her classic book “Little House in the Big Woods,” Laura Ingalls Wilder describes a magical time of year known as “Sugar Snow.” This is a late winter snowfall that comes just as the maple sap begins to flow, and it can extend the maple syrup season for several more weeks.

Sugar Snow is a phenomenon that has been observed for centuries in the maple syrup-producing regions of North America. The snow is important because it provides a layer of insulation for the ground, which helps to keep the soil and tree roots warm during the cool nights and helps the sap to continue flowing during the day.

According to Wilder’s descriptions, Sugar Snow was a highly anticipated event for her family. They would gather around the maple trees with buckets and spiles, tapping the trees and collecting the sap as it flowed. Once they had gathered enough sap, they would boil it down over an open fire to make maple syrup and sugar.

Today, many maple syrup producers in the northern regions of the United States and Canada still rely on Sugar Snow to extend the maple syrup season. The additional weeks of sap flow can lead to higher yields and a longer season for tapping trees and collecting sap.

In addition to being important for maple syrup production, Sugar Snow is also a beloved tradition for many families. It provides an opportunity to get outside and enjoy the snow, as well as to participate in the process of making maple syrup.

If you’re interested in experiencing Sugar Snow for yourself, there are a few things you should know. First, it typically occurs in late winter, just as the temperatures begin to warm up during the day. Keep an eye on the weather forecast and look for a stretch of days with temperatures above freezing during the day and below freezing at night.

Next, you’ll need to find a maple syrup producer who is willing to allow visitors during the sap-collecting season. Many producers offer tours and educational programs that allow visitors to learn about the process of making maple syrup and even participate in the tapping and collecting process.

Be prepared for the snow and cold weather. Dress in layers, wear warm boots and gloves, and bring a hat and scarf to keep your head and neck warm. And don’t forget to bring your sense of adventure and wonder, as Sugar Snow is truly a magical time of year in the world of maple syrup production.

The Straight Poop on Manure: How to Turn Waste into a Valuable Resource

Living on a farm is fun and rewarding, but if you’re taking care of farm animals, you’re going to need to keep their living spaces clean.

That means shoveling a lot of sh#t.

Manure is a natural byproduct of raising farm animals and can be a valuable resource for your farm and garden. While it may not be the most glamorous part of farm life, manure can provide numerous benefits for your soil and crops.

Uses for manure throughout the year

  1. Spring: Top-Dressing and Composting In the spring, manure can be used to top-dress your garden beds or added to your compost pile. By adding manure to your garden, you can provide a slow-release source of nutrients to your plants, which can help them grow strong and healthy. Composting manure can help create a rich, nutrient-dense soil amendment that can be added to your garden beds later in the season.
  2. Summer: Fertilizer During the summer, manure can be used as a fertilizer for your garden. Fresh manure can be too strong for your plants, so it’s important to age it before using it as a fertilizer. By applying manure to your garden in the summer, you can provide a steady supply of nutrients to your plants throughout the growing season.
  3. Fall: Cover Crops In the fall, you can use manure to help grow cover crops. Cover crops can help suppress weeds, improve soil structure, and prevent erosion. By using manure to fertilize your cover crops, you can ensure that they grow strong and healthy and provide your soil with valuable nutrients.
  4. Winter: Composting and Soil Health During the winter, you can continue to compost your manure and add it to your garden beds in the spring. Additionally, manure can be used to improve soil health during the winter. By spreading manure on your garden beds in the winter, you can help improve soil structure and provide a food source for beneficial microorganisms.

It’s important to note that not all manure is created equal, and some types of manure are more beneficial than others. For example, chicken manure is considered a “hot” manure and can burn your plants if not aged properly. Cow and horse manure, on the other hand, are considered “cool” manures and are safer to use in your garden.

While manure may not be the most glamorous aspect of farm life, it can provide numerous benefits for your soil and crops. By utilizing manure throughout the year, you can create a more sustainable and healthy farm environment. So, the next time you’re cleaning out the barn, don’t overlook the valuable resource that is manure.

How to build an effective compost system in your backyard, and what to do with it throughout the year

Composting is a great way to reduce waste and create nutrient-rich soil for your garden. However, it’s important to build a safe and healthy compost system in your backyard to prevent potential hazards.

How to build a compost bin

Here’s a step-by-step guide to building a safe and healthy compost system in your backyard:

Step 1: Choose a Location

The first step in building a safe and healthy compost system is choosing the right location. Select a spot that is well-drained, has good air circulation, and receives some shade. Avoid placing the compost system near a water source, as it can contaminate the water with pathogens and other pollutants.

Step 2: Select a Container

Next, select a container for your compost system. There are a variety of options available, including plastic bins, wooden boxes, and wire cages. Choose a container that is at least 3 feet wide and 3 feet tall, with a capacity of at least 10 cubic feet.

Step 3: Add Compost Materials

Once you have your container in place, it’s time to start adding compost materials. Compost materials can include kitchen scraps, yard waste, and other organic matter. Be sure to avoid adding meat, dairy, and pet waste, as these materials can attract pests and potentially spread disease.

Step 4: Layer Your Compost Materials

To build a healthy compost system, it’s important to layer your compost materials properly. Start with a layer of dry, brown materials like leaves or shredded paper, followed by a layer of green materials like vegetable scraps and grass clippings. Continue layering brown and green materials until the container is full.

Step 5: Add Water

Composting requires moisture to work properly, so it’s important to add water to your compost system. Aim for a moisture level of around 50%, which is roughly the same as a damp sponge. Be careful not to add too much water, as this can cause the compost to become too wet and create an unpleasant odor.

Step 6: Turn Your Compost

To ensure that your compost breaks down properly, it’s important to turn it regularly. Use a pitchfork or shovel to mix the compost materials, ensuring that air can circulate throughout the container. Turning the compost every 2-3 weeks will help speed up the composting process.

Step 7: Wait for Your Compost to Mature

Composting can take anywhere from a few weeks to several months, depending on the materials used and the weather conditions. Be patient and wait for your compost to mature before using it in your garden. Once the compost has a dark, crumbly texture and a pleasant earthy smell, it’s ready to use.

Composting is a great way to reduce waste and create nutrient-rich soil for your garden. However, maintaining your compost bin is crucial for it to function properly. In this blog post, we’ll discuss some tips for maintaining your compost bin and explore the different uses for compost throughout the four seasons we experience in West Michigan.

How to maintain your compost bin

  1. Monitor Moisture Levels: Compost needs moisture to break down properly, but too much water can cause the compost to become slimy and smelly. Aim for a moisture level of around 50%, which is roughly the same as a damp sponge. If the compost is too wet, add dry materials like leaves or shredded paper to absorb the excess moisture.
  2. Turn Your Compost: Turning your compost helps to distribute oxygen and accelerate the decomposition process. Use a pitchfork or shovel to mix the materials in your compost bin every 2-3 weeks. If you have a tumbler compost bin, you can simply turn the handle to mix the materials.
  3. Balance Green and Brown Materials: Green materials like fruit and vegetable scraps, grass clippings, and coffee grounds provide nitrogen, while brown materials like leaves, straw, and shredded paper provide carbon. A good rule of thumb is to aim for a 3:1 ratio of brown to green materials.
  4. Avoid Meat and Dairy Products: Meat, dairy, and pet waste can attract pests and cause unpleasant odors. Stick to plant-based materials like fruits, vegetables, and yard waste.

How to use your compost throughout the year

Now, let’s explore the different uses for compost throughout the four seasons we experience in West Michigan.

Spring

Spring is the perfect time to start using your compost in your garden. Spread a layer of compost over your garden beds and mix it into the soil. This will help to nourish your plants and improve soil health. You can also use compost to start seedlings indoors. Mix compost with potting soil to create a nutrient-rich growing medium for your plants.

Summer

In the summer, compost can help to retain moisture in your garden soil. Spread a layer of compost around your plants to help them retain water and stay hydrated. You can also use compost to make compost tea, which is a liquid fertilizer made by steeping compost in water. Use compost tea to water your plants and provide them with extra nutrients.

Fall

In the fall, use compost to prepare your garden for winter. Spread a layer of compost over your garden beds and mix it into the soil. This will help to protect your plants and improve soil health over the winter. You can also use compost to mulch your garden beds, which will help to retain moisture and prevent soil erosion.

Winter

In the winter, you can continue to add materials to your compost bin, but the decomposition process will slow down due to the colder temperatures. You can also use compost in the winter to make seed starting mix. Mix compost with potting soil to create a nutrient-rich growing medium for your seedlings.

Happy composting!

From Tree to Table: A Guide to Making Maple Syrup Over an Open Fire

Making maple syrup at home over an open fire is a fun and educational experience that children of all ages can enjoy. Not only is it a great way to spend time outdoors, but it also provides an opportunity to learn about nature and the maple syrup production process. In this article, we will provide a step-by-step guide on how to make maple syrup at home over an open fire.

Step 1: Tap the Trees

The first step in making maple syrup is to tap the trees. This can be done in late winter or early spring when the temperatures start to rise above freezing during the day and fall below freezing at night. The ideal temperature for sap flow is around 40 degrees Fahrenheit. To tap the trees, drill a hole in the trunk of the maple tree about 2 inches deep and insert a spout into the hole. Hang a bucket or a plastic bag from the spout to collect the sap.

Step 2: Collect the Sap

Once the trees have been tapped, you will need to collect the sap. Check the buckets or bags daily and pour the sap into a large pot or a bucket. The sap should be kept refrigerated until you are ready to start boiling it.

Step 3: Build the Fire

To make maple syrup over an open fire, you will need to build a fire. Start by gathering dry firewood and kindling. Arrange the firewood in a teepee shape, leaving enough room in the center for the pot. Light the kindling and add more firewood as needed.

Step 4: Boil the Sap

Once the fire is going, place the pot of sap on the fire and let it boil. As the water evaporates, add more sap to the pot. It takes about 40 gallons of sap to make one gallon of maple syrup. This process can take several hours, so be patient and keep an eye on the pot to make sure it does not boil over.

Step 5: Filter the Syrup

Once the sap has been boiled down to syrup, remove it from the fire and strain it through a filter to remove any impurities. Pour the syrup into clean, sterilized jars and seal them tightly.

Making maple syrup at home over an open fire is a fun and educational experience for children. Not only will they learn about the process of making maple syrup, but they will also get to spend time outdoors and learn about nature. It is important to note that the process can be time-consuming and requires some special equipment, so it may not be suitable for everyone. However, with a little patience and effort, anyone can make delicious maple syrup at home.

Build a greenhouse to improve and extend your harvest season

Building a greenhouse is a great way to extend the growing season and enjoy fresh fruits and vegetables all year round. One affordable and sustainable option is to build a greenhouse using concrete, reclaimed or purchased wood, and old windows. This type of greenhouse is relatively easy to construct and can be customized to suit your needs and preferences.

First, you will need to prepare the foundation for your greenhouse. A simple and sturdy option is to use concrete to create a slab foundation. This can be done by digging a hole and pouring in concrete to create a level surface for the greenhouse to sit on. The slab should be at least 4 inches thick and needs to be level to ensure that the greenhouse is stable and well-supported.

Next, you will need to gather materials for the frame of the greenhouse. One cost-effective and sustainable option is to use reclaimed or purchased wood. This can be lumber from old buildings or pallets that are no longer in use. The wood should be in good condition and free of rot or decay. If you decide to use new wood, make sure to choose a wood that is naturally rot-resistant like cedar or redwood.

Once you have the wood, you can begin to construct the frame of the greenhouse. The basic design is a rectangular structure with a peaked roof. The walls of the greenhouse can be made from wood planks and the roof can be made from reclaimed metal or tin. The frame should be sturdy and well-secured to the concrete slab foundation.

To complete the greenhouse, you might find old windows to use as the walls. These can be salvaged from old buildings or purchased from salvage yards. The windows will provide natural light and heat to the greenhouse and can be secured to the frame with hinges or latches.

To finish, you can add a door to the front of the greenhouse and add any additional features such as shelves, benches, or irrigation systems. Finally, you can also add insulation to the walls and roof to help keep the greenhouse warm during the colder months.

Building a greenhouse using concrete, reclaimed or purchased wood, and old windows is a great way to create an affordable and sustainable growing space. Not only will you be able to enjoy fresh fruits and vegetables all year round, but you’ll also be doing your part in preserving resources and keeping materials out of landfills. With some creativity and effort, you can have your own greenhouse that’s not only functional but also beautiful.

Chicken spotlight: Salmon Favarolle

Raising chickens for eggs is a fun and rewarding experience, and the Salmon Favarolle breed is a great option for those looking for a unique and productive bird. This breed is known for its distinctive appearance, friendly personality, and consistent egg production.

Appearance:

The Salmon Favarolle breed is best known for its unique coloration. The feathers on the head and neck are a rich salmon color, and the rest of the body is white or cream-colored. The breed has a distinctive crest on its head and fluffy, muffs on its cheeks, making it a very recognizable and attractive bird.

Personality:

Salmon Favarolle chickens are friendly, social birds that are easy to handle. They are known to be friendly with both other chickens and with their human caretakers, and they have a calm and docile personality. This breed is not aggressive and is unlikely to harm other chickens or humans, making them an ideal choice for families with children.

Health and Longevity:

Like all chicken breeds, Salmon Favarolle chickens are susceptible to certain health issues. They have a tendency to develop respiratory issues if they are housed in damp or poorly ventilated environments, and they can also be prone to mites and other parasites. Regular cleaning and health check-ups will help to prevent these issues and ensure that your chickens remain healthy and productive.

In terms of longevity, Salmon Favarolle chickens can live for several years if they are well cared for. The average lifespan of this breed is around 6 to 8 years, although some chickens may live longer with proper care.

Egg Production:

One of the main reasons people choose to raise chickens is for the eggs, and Salmon Favarolle chickens are an excellent choice for egg production. These birds are known to be very productive layers, with a peak laying period that can last for several years. On average, each bird will lay between 200 and 300 eggs per year, and the eggs are medium-sized and have a creamy white or light brown color.

Conclusion:

Salmon Favarolle chickens are a great choice for those looking to raise chickens for eggs. With their distinctive appearance, friendly personality, and consistent egg production, they make a great addition to any family farm. With proper care and attention, they will provide you with years of enjoyment and fresh, delicious eggs.